Oct 25, 2012

A retro dress

With age of 10 I still didn't have a clue in which direction my tastes in fashion and music will take. Once I visited my uncle who just happened to buy a new portable gramophone ( one of the kind you could get in Yugoslavia in those days) and it look similar to this one (the photo is taken from Muzej grada Rijeke).

At that time my uncle wore long hair, leather jackets, jeans and shoes with high sole - and he drove a motorbike. Besides the gramophone he bought some long-plays: I still do remember what it was: Rolling Stones, Bee Gees and Boney M. My uncle was my idol at that moment.
Imagine 10 years old child dancing with half mad uncle in the grandma house, playing music as loud as possible and jumping and screaming like wilds...

I think, on that day I knew which kind of music I will like. OK, Boney M not that much. And fashion... fashion must follow.  I simply adore fashion of 70s so I made this dress in that name.


Oct 23, 2012

Birds' cardboard house

Every morning when I wake up there are few things happening that really make my day. At least my mornings. I go to the toilet, open the window  and my cat is there, immediately jumping on it in order to get first chat of the day. With sparrows which occupy the pear tree facing my window. And this is really a funny and wonderful moment I enjoy every morning. However, in cold winters, not that much.
According to the weather coaster, this winter should be very cold, -31. I have never felt this temperature in my life, so I suppose, the sparrow living in this area neither.
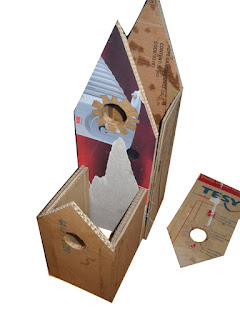
For these small and dear creatures I figured out a pretty big birds' house in Victorian style.There should be place enough for around 4 bird families, or even more, if they not quarrel.
Here is the point I reached up to now.

And some first steps so you could see how it is done. The bigger part is separated into two 'flats'.


It still needs a roof on the top and lot of decoration after coloring it.

I can hardly wait to finish it, and I can hardly wait its first visitors. Still I must admit that I am really very eager to see how the cardboard will bear this winter.


Oct 21, 2012

A quick jacket for beginners


This model is perfect for beginners in sewing. You will need following:
  • About 2m of strechable fabric that, in the best case, has some percentage of wool and that will not come apart.
  • 1 or 2 to bigger buttons.

Process

  • Measure your back with. The measurement is taken horizontally between shoulder blades (i.e. from sleeve seam to sleeve seam).
  • Each front side should equal to the width of the back. For example, if your back width is 40 cm, you need a total of 1m20of the fabric. 40cm for back side and 2x40cm for both front sides.
  • Fold the fabric in half to find the middle.
  • Divide the result of your back width into half. For example, if it is 40cm, then it would be 20cm.
  •  Measure 20 cm starting from the folded part of the fabric. Mark this place and make there holes for sleeves.
  •  The holes need to be more oval in shape, as shown in the image and they should be about 15cm away from the top of the fabric.  


  • Make a sleeves (use some model from Burda, or clothes you do not wear).

  • Sew the sleeves and the holes together, and you're almost done.
  • If you collar is too squashy and not standing firmly, cut another part of the same length as the fabric, and width of about 17cm. In our case, this would be a rectangle with dimensions of 1m20 x 17cm. Sew that piece on the upper part to get reinforced, double collar.


  • Fold the top edge of the collar with both sides in half and sew it. 
  • Make a hole for the button. If you prefer, you can fold the fabric just above the breasts and add one more hole and button (see first picture).

Oct 18, 2012

Laptop cardboard holder

For one of my dear friend and colleague, who deserves a special place on this blog, I made a holder for a laptop.


I have to admit that I should have done it much earlier, but having decided to change the company, he finally managed to put me in action. 
Anyway, he helped me a lot regarding my cardboard projects. He wouldn't thrown away even the smallest cardboard box.

A holder for the laptop should have some holes, so that the heat can easily flow away. And since he likes to laugh a lot, just like children do, I immediately thought about smiley. However, when you get to smiley's mouth, I could not help but add the first and then the second tooth. Well, I really couldn't resist it.
First I created an initial draft.


I made three identical cutouts on the cardboard plate and fixed them together using plastic glue.

Then I cutted a lateral lever, which rely on the plate from the back; the lever is about 15cm high.
Then I fixed the front cardboard pieces (about 1.5 cm wide), so the laptop would not fall down.
I covered ends with paper tape.


After this initial fixation of cardboard parts, I took wooden glue mixed with a bit of water and did the first impregnation process. When it was dry I made a mixture of wooden glue, wood putty, wall putty, linseed oil and a little water. I waited till it was dry again and I colored it - using a golden dust for teeth - I couldn't help myself.:)
He says, it serves him well and he takes it even into bed ...

Oct 6, 2012

In the case of hunger, brake the glass

A great aridity happened this summer in Serbia and according to the news, it will be great famine. So I prepared something, just in case.

For this small project you will need following: 

  • A wooden frame (or you make it out of cardboard) that has a depth of about 2cm. 

  • A piece of pressed cardboard (2mm) that has to be exactly of same size as the frame itself.
  • A bit of dried flowers 
  • Various grains and seeds you most probably have somewhere in your kitchen. Personally, I have bought some seeds for birds, there you have a pretty nice collection.
  • Wooden glue 
  • Hammer and nails for frame fixation

Divide the cardboard plate into 9 parts. Use the wooden glue in order to fix flowers and seeds on the cardboard surface.

Make 4 dividers out of cardboard that will serve to separate these 9 parts.


Fix it carefully on the cardboard plate. Use wooden or plastic glue. Let it dry completely.


Turn it and fix it on the frame using hammer and nails.
Do not forget to enclose a frame hook .. and done.