Jun 20, 2011

Cardboard drawer part III

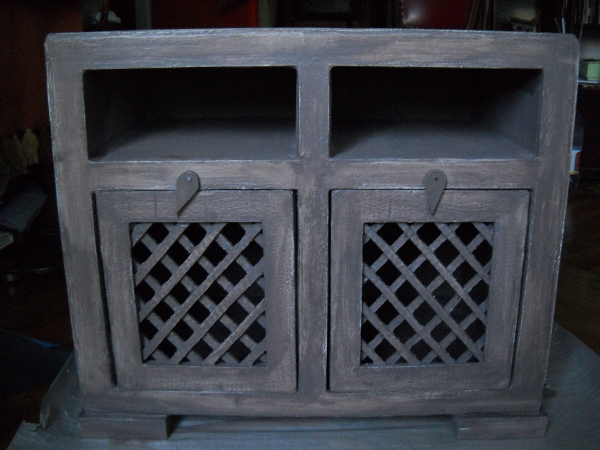
At one moment the shelf looked like this, and afterward I haven't taken any photo until it was done completely.


I like old furniture in general, so I tried to reach old effect also on this one and I think more or less I reached that aim. The front doors are also there. All in all I am very satisfied with final results. Special thanks to my niece who is helping me in creation of the carton furniture. Special thanks to dear God, who finally helped also to her to find a matter of interests that last more then one hour. We have already started a new project, I will write later about it.


Jun 16, 2011

Cardboard drawer part II

As I promised in my last post, I publish some photos of a drawer. First I cut front parts. Two of them look like this (the back part of the drawer has identical size but no cuts in the middle of it, so I haven't taken a photo of it).


I cut around 40 pieces of cross parts that serve to bind front, middle and back parts together. The most boring but absolutely necessary part of work is to fix all joints with a tape.


For the moment, the drawer looks like this.


Jun 15, 2011

Cardboard drawer

I have to admit, that I am not really a cook. Everyone who knows me in person would agree with this statement. I simply do not like to cook, neither for one person nor for two or three, and for more than this- I got really sick. That's why I do have a small cooker with two hotplates and an oven, and it will probably die NEVER. It serves mostly to boil water for Turkish coffee, that I like the most, so some kettle makes not much sense.

My cook is standing now on such wooden board placed on a heater. All this looks pretty ugly, so I will not make a photo of it.

Since I discovered the carton furniture, I finally decided to deal with my kitchen. I only hope I will not start to throw out wooden furniture in order to replace it with carton one, as lot of people (at least in Serbia) exchange their parquet floor with laminate! My aim is to create carton drawer on which I would put my cook, and that should look more or less like this.


This small project nears already its pre-final phase, the construction is done, drawers and doors are still missing. Tomorrow I will post images. I haven't seen on Internet that someone did a classical drawer door on carton furniture, I am really eager to know if it's possible.

Jun 12, 2011

A bag with abstract theme

The kitchen shelf has exhausted me a lot. After I have finished it, somehow I felt like being in a light depressive state. From this state a bag with abstract theme has come out (I found an image on photobucket.com which has inspired me).


Another bag, which is still not finished is inspired by an image of Kandinky. On the photos you may see how it looked like before I sewed the pieces and after that.


Jun 7, 2011

Cardboard shelf part VI and that's it

So finally done! Honestly, I thought this would never happen. In my last post I have already mentioned, that I would try to make some small resume of stuff I used in order to create a shelf.
Please note that I am very negligent concerning the costs and writing it all down, but here are some rough information:
  • around 12 boxes used mostly for relocation (a lot of parts are left since I couldn't use them because they were too small for this shelf)
  • 1kg 1/2 of wood glue
  • 1kg 1/2 acrylic wood putty (I hope this is the right word for it)
  • a bit of linseed oil, around 50ml
  • 1kg white primary color for wood
  • 1/2 kg specific glue also for wood, but it works for some other stuff, like gum or shoes.
  • 1/2 kg acryllic wood varnish
  • 1kg yellow acrylic color
  • a bit of blue, black, brawn color (I used walls' toner)
  • 1/2m jute tissue
  • 1/2m cotton tissue (beige color)
  • a bit of rope
  • 1/4m tissue with stripes.
  • around 40 pieces of hot glue sticks
This is it. It costed me around 70 euros, but note that I still have something left - for smaller shelf perhaps.
And finally, this is what came out of it:


I samo jos da primetim, fotografijom se nikada necu baviti:)))
Just to mention, I will never go in for photography:)))

Jun 1, 2011

Cardboard kitchen shelf- part V


The end is almost there, unfortunately  I have still a billion ideas what I could still add on it. When everything is done, I will try to make small resume of the stuff I used, I believe it could be useful for those who would like to create similar things. The shelf mutated from white into green. I glued pressed cowslip (primula veris) on the shelf's sides (I need some more flowers for the front side, so I guess the shelf will be  updated in spring next year:)). I covered the top (still not fixed). Here some images.